Tear & Puncture Repair: Field Fixes & Professional Solutions
It is usually the case that the durability of heavy-duty tarpaulin is taken for granted, but unexpected tears and punctures, when they occur, will surely test its reliability. If, for example, you are out in the field enduring bad weather or relying on a tarpaulin to keep your expensive equipment safe, then damage will reduce its effectiveness at that moment, which is quite unfortunate. You can find the best tips for overcoming these problems in this blog. We will cover everything from quick, practical field repairs to professional repair solutions, and explore practical methods to prolong your tarpaulin’s lifespan and keep it performing under the harshest conditions. Get ready for us to reveal the essential tools, the experts’ tips, and the practical advice that will help you have a tarpaulin that never gives up, regardless of the situation.
Understanding Tarpaulin Tears

Tarpaulin rips mostly occur when the material is exposed to harsh conditions, sharp objects, or sustained excessive tension for extended periods. Among the most common reasons are the sun’s effects, strong winds, rough surfaces, and mishandling or improper storage of the tarpaulin. Determining the origin of the tear is crucial to effectively resolving the problem. Tarpaulins should be regularly checked and maintained to prevent tears; when tears occur, they should be repaired immediately to preserve their durability and usability.
Common Causes of Tarpaulin Tears
- ☀️
UV Exposure The fabric can be weakened by prolonged exposure to the sun, making it more brittle and susceptible to tearing.
- 💨
Heavy Winds Tarps can be damaged by super-strong winds, leading to rips or punctures at areas where the tarp is already stressed.
- 🔷
Abrasive Surfaces If a canvas is in constant contact with rough or sharp surfaces, it might eventually wear out, leaving areas that tear easily.
- ⚖️
Overloading When a tarpaulin is used to bear a weight well beyond its limit, it might stretch and tear.
- 📦
Improper Storage If a tarp is folded or stored while wet, dirty, or crumpled, the fabric may lose its strength and become vulnerable to future damage.
Identifying Different Types of Tarpaulin Damage
🔪 Tears and Rips
Mainly caused by sharp objects or excessive pressure, these usually occur at the tarpaulin’s stress points.
⚡ Abrasion
The material can be progressively weakened by rough surfaces, which wear it down over time.
📍 Punctures
Tiny holes made by sharp objects can ruin the waterproofing and the lifespan of the tarpaulin.
☀️ UV Damage
The sunlight is notorious for gradually breaking down the material, causing it to lose color, become brittle, or even crack.
🦠 Mold and Mildew
Building dampness through improper storage can sometimes lead to fungi which will not only make the fabric weak but also emit unpleasant odors.
If the damage mentioned above is recognized at an early stage, it would be very easy to implement corrective measures, thereby prolonging the tarpaulin’s life.
The Importance of Timely Tarpaulin Repair
One of the main reasons why timely tarpaulin repair is essential is to maintain functionality and avoid expensive replacements. The tarpaulin is still effective in protecting goods or structures from environmental elements if the damages are addressed immediately. Neglecting repairs, on the other hand, can lead to faster deterioration, increased costs, and even safety hazards, particularly in industrial or construction areas where tarpaulin use is pivotal. Thus, a proactive approach to repairs not only extends the product’s longevity but also adds greater value to the user.
Essential Tools and Materials for Tarpaulin Repair

Recommended Tarpaulin Repair Kits
🔧 Repair Kit All-In-One
It comprises adhesive patches, a strong waterproof glue, and a reinforcement tape. The kit is perfect for fixing rips, tears, or small holes on different kinds of tarpaulins.
💪 Heavy-Duty Vinyl Repair Kit
This kit, especially made for vinyl tarpaulins, includes patch materials and an industrial-grade, longest-lasting adhesive for very durable repairs.
🌧️ Waterproof Tape Kit
It consists of weatherproof, extreme tape that allows quick, easy closure of minor damage. The tape is suitable for temporary fixes under outdoor conditions.
🔥 Heat-Sealing Repair Kit
The kit includes heat-sealable patches and a portable heat tool, making it perfect for more substantial, more permanent repairs on heavy-duty tarpaulins.
Select a repair kit based on the tarpaulin type and damage severity to achieve the best results. Always adhere to the manufacturer’s application guidelines.
Choosing the Right Adhesive for Tarpaulin Repairs
Selecting the most appropriate adhesive for tarpaulin repair involves considering the material, the extent of the damage, and the environment where the adhesive will be applied, among other factors. For PVC tarpaulins, using PVC-specific adhesives is recommended because they form strong, flexible bonds that withstand environmental conditions. For polyethylene or polypropylene tarpaulins, use adhesives specifically designed for these materials, as they are not very adhesive-friendly.
Moreover, the repair location can lead you to a different option—considering the outdoors, use water-resistant or waterproof adhesives to avoid adhesive degradation in wet conditions. If the repaired area will be subject to harsh conditions, a strong contact adhesive or epoxy may be a better option for long-term durability. Always check the adhesive manufacturer’s recommendations for compatibility with your tarpaulin material to achieve the best results.
Adhesive Selection Guide:
- PVC Tarpaulins: Use PVC-specific adhesives for strong, flexible bonds
- Polyethylene/Polypropylene: Choose adhesives designed for poly materials
- Outdoor Repairs: Select water-resistant or waterproof adhesives
- High-Stress Areas: Consider contact adhesive or epoxy for long-term durability
Types of Tarpaulin Patches: Fabric and Vinyl Options
The tarp material and the type of damage primarily influence the selection of tarpaulin patches. Patches made from fabric tarpaulins are usually made of heavy-duty canvas or polyester, making them perfect for fixing breathable, flexible tarps. Sewing or gluing these patches is quite simple and they are suitable for lighter uses or indoor applications. Conversely, vinyl patches are preferred for PVC or plastic-based tarpaulins. Patches of vinyl are long-lasting, waterproof, and very tear-resistant. This feature makes them the most excellent choice for outdoor or high-stress areas. To achieve a firm repair, use an adhesive or heat-sealing method compatible with and designed specifically for the patch and base material. Before patch application, always make the damaged area very clean and well-prepared for results that last.
Step-by-Step Guide to Tarpaulin Tear Repair

Preparing the Tarpaulin for Repair
1 Clean the Damaged Area
Thoroughly clean the area around the tear with a mild soap-and-water solution. Remove dirt, grease, and debris completely to ensure the patch adheres properly. Afterward, allow the surface to dry completely.
2 Trim Loose Edges
If the tear has frayed or jagged edges, cut them smoothly and cleanly with scissors. This will allow you to achieve a smooth, even surface for the repair.
3 Select an Appropriate Patch
A patch material that is the same as or compatible with the tarpaulin’s material should be chosen. This will give a repair that is not only secure but also long-lasting.
4 Gather Required Tools
Make sure all necessary tools are ready, including adhesive, a roller or applicator, and any specific items recommended for your chosen patch-and-repair method. Being prepared will make the repair process quicker.
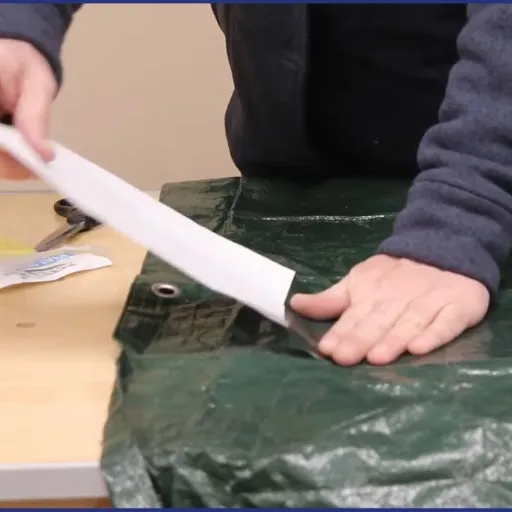
Applying Tear-Aid® Fabric Repair Patches
1 Clean the Damaged Area
Wipe the entire torn or damaged place thoroughly with a clean cloth dipped in isopropyl alcohol. The reason is to remove dust, dirt, and oils that would prevent the patch from adhering correctly to the tarpaulin.
2 Prepare the Patch
Cut the Tear-Aid® patch into a shape slightly larger than the damaged area, rounding the corners to prevent flipping. This fine cutting extends the patch’s longevity and adhesion.
3 Apply the Patch
Remove the backing from the Tear-Aid® patch, then gently place it on the tear. Make sure it is pressed flat with the surface and that there are no trapped air bubbles or creases.
4 Secure with Pressure
Use a roller or a strong applicator to press the patch firmly onto the material. Maintain the same pressure throughout the process to create a strong bond between the adhesive and the tarpaulin.
5 Allow Time to Bond
To achieve the best possible results, let the adhesive cure according to the manufacturer’s specifications. This step will ensure a repair that lasts even under pressure or complex conditions.
When you take the time to follow all the procedures and pay attention to details during application, you will be able to rejuvenate the functionality and durability of your tarpaulin in no time.
Using Vinyl Repair Kits Effectively
In my opinion, applying a vinyl repair kit requires meticulousness and patience. To begin with, I take every care to properly clean and dry the spot so that the adhesion will be perfect. After that, I prepare the patch so its size is just a bit larger than the damaged area, thereby avoiding peeling later. I use the glue included in the kit to press the patch into position gently and, at the same time, try to remove any air bubbles that may have formed. It is essential to wait the entire recommended drying period, since hurrying can affect the strength of the repair. I have repaired my tarpaulin many times and under really tough conditions, just by following these steps.
Best Practices for Tarpaulin Maintenance

Preventative Measures to Avoid Tarpaulin Tears
✓ Proper Storage
The tarpaulin should be stored in a cool, dry place as standard procedure. It should be aired out, cleaned and perfectly dried before being kept to avoid the growth of fungi and the deterioration of the material.
✓ Avoid Overstretching
Do not make the tarpaulin too tight. The overstretched part of the isolated materials and hence, the chances of them tearing are increased.
✓ Use Reinforcements
Add layers or patches at high-stress points, such as grommets and corners, to reinforce them and prevent weak areas from wearing out.
✓ Secure Properly
Use elastic cords or ropes with equal tension so that no wind can strain or even snap the tarp.
✓ Regular Inspections
Routinely check for wear and tear and tiny holes, and use repair kits to fix them immediately to prevent further damage.
You can make the tarp last longer and keep it working for you by taking these preventive measures.
Proper Storage Techniques for Tarpaulins
When storing tarpaulins, I make sure they are clean and scorched before putting them away, as moisture can cause fungus or mildew. I fold the tarp neatly along its natural seams to avoid creasing, then store it in a cool, dry area away from sunlight to prevent UV degradation. When appropriate, I use a storage bag or container to keep it safe from pests and unintentional damage. By following these procedures, I can maintain my tarpaulin in excellent shape for later use.
Seasonal Maintenance Tips for Tarpaulin Longevity
🔍 Inspect for Wear and Tear
Conduct regular inspections of your tarpaulin looking for holes, tears, or weak areas. Immediately patch up with repair tape or sealant to prevent the damage from worsening and address any minor damage.
🧼 Clean Thoroughly
Clean your tarpaulin after each use to remove dirt, debris, and stains. Mild soap and water will do the trick, and you should avoid harsh chemicals, as they could weaken the material over time.
💨 Ensure Proper Drying
Never put away a tarp that is not completely dry. Storing a moist tarp can lead to the growth of mold and mildew, hence, producing an unpleasant smell that might easily compromise the quality of the tarp.
🏠 Store in a Controlled Environment
The tarp should be stored in a superb, dry location, away from UV rays and extreme temperatures. Proper storage can help prevent the tarp from wearing down due to environmental conditions.
🔄 Rotate and Use Seasonally
If you have more than one tarp, use them in a seasonal rotation. By doing so, you will not only prevent excessive wear on a single tarp but also extend its lifespan when used together.
Troubleshooting Common Tarpaulin Repair Issues
Dealing with Adhesive Failures in Tarpaulin Repairs
Repairing tarpaulins, a common practice, often leads to adhesive failures. These failures might result in the polymerized areas being completely unsealed or only weakly bonded. The first step in the procedure is to ensure that the areas where bonding will take place are clean and dry. Dirt, grease, and moisture can negatively affect the performance of adhesives. The area should be thoroughly prepared, for instance, with rubbing alcohol or a similar cleaning agent.
The type of adhesive being used is another factor to consider. Some adhesives are meant for heavy-duty tarps and some are for particular materials like vinyl or polyethylene. It is always better to choose an adhesive compatible with your tarpaulin material for the best outcome. For even more serious and recurrent failures, heat-activated adhesives or a solvent-based material might be the choice for their ruggedness.
On top of that, using the wrong application techniques will always bring about adhesive failures. The adhesive must be applied in a uniform manner and the manufacturer’s instructions regarding drying or curing times must be strictly followed. It is also essential to apply significant pressure to the area to ensure a robust connection between the surfaces. If problems persist even after proper preparation and application, it might be time to consider a professional-grade patch kit or a repair specialist.
What to Do When Patches Don’t Adhere Properly
Quick Troubleshooting Steps:
- Reassess the surface preparation – verify that the area is clean, dry, and devoid of dust, grease, or other small particles
- Remove any dried adhesive residue carefully, then start the process over
- Select a high-quality adhesive compatible with the repair material
- Strictly follow the manufacturer’s application instructions
- Give the adhesive sufficient time to fully cure before testing the repair
- If the problem persists, consider using a stronger adhesive or a professional-grade patch kit, or consult a repair professional.
Handling Large Tears in Tarpaulins: Advanced Solutions
The repair of large tears in tarpaulins and similar materials with advanced repair solutions usually involves a combination of strong materials and professional techniques to ensure repairs last a long time. First, the damaged area should be cleaned thoroughly to ensure no dirt, oil, or other residues that might prevent a strong bond remain. Besides, use repair tape or fabric patches specifically made for tarpaulins; these materials will be more resistant to wear, water, and UV exposure.
Also, for added strength, if the material allows, apply heat-sealing techniques, as heat-welded seams can provide a more secure, weather-resistant bond. On the other hand, industrial sewing with reinforced thread can be used to stitch the tear, and the stitched area can then be sealed with a waterproof coating. Suppose these treatments do not produce the desired effect. In that case, it is better to consult a repair expert or replace the tarpaulin completely, as this would be the most practical solution and still provide the heavy-duty application and durability.
Reference Sources
- How to Repair a Torn Tarp Quickly and Easily
This guide provides step-by-step instructions for repairing small holes and punctures in tarps, including cleaning, patching, and adhesive application. - Tarp Repair & Maintenance by Best Tarps
Offers information on heavy-duty vinyl repair tape, vinyl cement glue, and grommet repair kits for tarp maintenance. - How to Repair a Torn Tarp Quickly and Easily (Alternate Guide)
Another detailed guide from Tarp Supply, focusing on cleaning and preparing the damaged area for effective repair. - Tarp Repair & Maintenance Supplies
A resource for purchasing durable tarp repair supplies, including adhesive tapes and grommet tools.
Frequently Asked Questions (FAQs)
How does using a vinyl repair patch help to fix holes and rips in a tarp fast?
Using a vinyl repairing thread can be an easy, durable solution for rips and holes as it effectively covers the damaged part with a seal that is both air and water-proof. Most kits come with either an adhesive-backed clear patch, which is hardly visible, or a matte finish option that is dirt-resistant and matches the tarp. The patch is made from either elastomer or polyurethane, which makes it resistant to wear and tear and stays soft. For materials such as canvas coated with vinyl or Sunbrella®, it is advisable to use a repair patch kit meant for fabric and vinyl. The first step is to clean the surface thoroughly—removing oils and saltwater residues—and ensure it is dry to allow the aggressive adhesive to adhere well. Then press down hard, and let the cure time pass; the result is often puncture-resistant and can be used for tents, awnings, or backpacks.
Is there a difference between tear-aid repair patches and a generic repair patch kit for inflatables?
Tear-aid repair patches are usually broken down into specific tear-aid like fabric characterizations- Type A being for tapestries such as canvas, and Type B being the one that accommodates vinyl and plastic- while generic repair patch kits are likely to resort to the usage of adhesive tapes for fabrics or just plain urgent patches. Tear-Aid® repair is commonly introduced with an elastomer-based, non-oiled adhesive that adheres to vinyl-coated textiles, PVC, and fiberglass-reinforced materials, and offers even greater abrasion resistance than many fabric tapes. A branded repair patch kit is likely to guarantee airtight and watertight seals that can accommodate rafts, inflatable boats, and air mattresses, whereas cheaper kits can fail when exposed to UV or prolonged saltwater. Patches made of materials like neoprene or nylon usually require compatible gluing to keep their breathability and flexibility. It is essential to get a kit compatible with the material; for example, vinyl patches for vinyl-coated gear and Type A for fabric tents or backpacks.
What steps should you follow to use a vinyl repair patch for patching a hole or tear in an inflatable raft or air mattress?
Identify the hole first then clean and dry the spot properly; eliminate any dirt, grease, sunscreen, or saltwater buildup to get a good bond with the strong adhesive. Cut a vinyl repair patch that goes around the defect not less than an inch on all sides—this procedure will yield a puncture-proof, watertight repair that is able to tolerate both abrasion and flexing. Employ a patch composed of elastic material and furnished with a polyurethane face that is UV resistant and non-oily thus having a long-lasting repair capability to resist becoming gummy. Get rid of air bubbles, then hold or press for the duration of the curing period as recommended; many tear-aid repair patches become airtight and waterproof when correctly set. These methods are helpful for inflatables, hot tubs, and the like, and you may even use them for vinyl-coated awnings or carrying bags when you need a reliable field fix.
Are puncture-resistant, matte-finish field fixes available for tents and tarps?
You can apply fabric patches and tear-aid Type A products to canvas or nylon tents to achieve a puncture-resistant repair while preserving the material’s matte finish. For vinyl-coated fabrics or tarps, choose a vinyl repair patch or an invisible patch with an abrasion-resistant polyurethane layer and a powerful adhesive. If you want to reduce brightness, choose the matte finish option. Many repair patches offer an uncomplicated application process: clean, put on and press; the patches that are backed by adhesive will stick even under harsh conditions and will remain flexible. For larger rips, you might need to use a combination of an internal backing patch and an external repair patch kit to regain strength and control the rip’s propagation. These solutions are beneficial for awnings, backpacks and even fiberglass-reinforced tarp edges that are subjected to tough use.
Which materials and adhesives would be most effective for repairing specialized equipment such as Sunbrella® awnings or neoprene hot tub covers?
Sunbrella® and comparable acrylic materials typically perform very well with adhesive and patches that are fabric-specific and designed for non-oiled surfaces, while neoprene and rubberized hot tub covers require flexible, waterproof adhesives which are typically associated with vinyl repair patch or tear-aid type B systems. A repair patch is made from materials compatible with the substrate—polyurethane or elastomer patches for vinyl-coated items and fabric patches for canvas or Sunbrella®—and should use an aggressive adhesive that remains elastic and gummy to withstand flexing. For neoprene, select patches and glues formulated for rubbery, elastic composition to maintain airtight and watertight seals under flex and temperature changes.


